Showing posts with label BUGS. Show all posts

Friday, June 1, 2012

A friendly BEE and Dirt Pudding with Jolly Rancher Flowers

Roger has developed an aversion to bees.  I guess I can't really blame him--it is a bit intimidating when they dive-bomb your face buzzing menacingly.  But whenever Roger is startled by a bee, I make sure to remind him that we need bees in order to have fruit and honey.  To emphasize the idea of the usefulness of bees, I thought it would be a worthwhile for the Camp Scarlet crew to learn a little more about what bees do.

We checked out some great books from the library.  The Beautiful Bee Book by Sue Unstead is a fantastic resource packed with facts about bees, with beautiful illustrations and easy to understand text.  As an added bonus, its sturdy lift-the-flap and turn-the-wheel pages kept the kids engaged.  I enthusiastically recommend this book.

Buzz, Bee, Buzz! by Dana Meachen Rau is a fact-filled book just perfect for emergent readers.

I just love Magic School Bus books, don't you?  Joanna Cole always manages to pack tons of facts into fun stories, making learning about any subject delightful.  The Magic School Bus: Inside a Beehive is no exception.  Ms. Frizzle's lucky students go on a field trip to meet a beekeeper at his hive, but when he's late arriving, the class shrinks down to bee size to take a look inside the hive.
Incidentally, I tried to figure out how to take the Camp Scarlet kids on a similar field trip, but I just couldn't swing it.

Last, but not least, we read The Very Greedy Bee by Steve Smallman.  This greedy bee wants to lay around sipping nectar all day instead of sharing and helping the other bees.  One day, he sips too much, and it is only through the kindness of some fellow insects that he is able to find his way back to the hive, determined to share from then on.

After reading, we were inspired to do some bee-dancing.  The Magic School Bus: Inside a Beehive and The Beautiful Bee Book both have good illustrations and clear descriptions of how bees dance and what the dances mean.

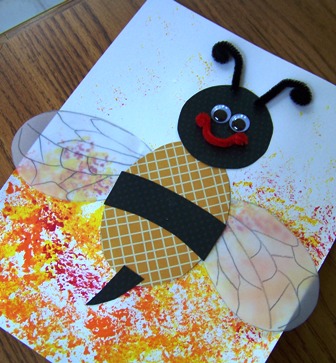
Next, we made bees.  I used this template from First School, cutting the body, head, and stinger from scrapbook paper, and the wings from vellum.  I was looking for a honeycomb or hexagon pattern for the body of the bee, but this works, right?

The kids decorated backgrounds for their bees.  Roger used a sponge to paint a flowery field for his bee, and Pal used markers to create a flowered background.

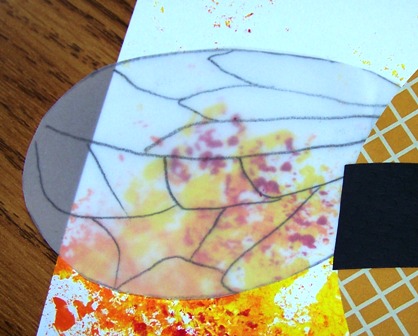
I used a pencil to draw veins on the wings of Roger's bee, and because the vellum is semi-transparent, it came out looking beautifully life-like.
Cute!

Of course, once we had bees, we needed some flowers for them.  I saw this idea to make flower suckers out of jolly ranchers and lifesavers a few months ago on Catholic Icing, and thought they would be perfect.  I found out too late that we didn't have any wooden skewers, but I think the Popsicle sticks work, too.

We planted our flowers in dirt pudding with gummy worms--yum!  The family loved it.  Thanks to M for inspiring the idea.

So now hopefully Roger will be a little more tolerant of the bees buzzing about--they're helping us grow yummy vegetables in our garden.

Thursday, May 31, 2012

Ladybug Rock Pendants

Ah, at last, the long awaited ladybug craft!  Sure hope you think it was worth the wait :)

So who doesn't love a rock painted like a cute little ladybug?  (rhetorical.  No need to respond).


To make one, just find a smooth-ish, oval-ish rock, and paint it.  You could go with the traditional ladybug red, but ladybugs come in all different colors, including black and yellow.

After your background color is dry, use a black paint pen or black paint with an applicator top, to add a head, a center dividing line, and spots--use red if your bug is black.  As you're adding the spots, keep in mind that ladybug spots are symmetrical.

Next, add a couple of googly eyes, or paint on eyes, if you prefer.


Cute, yes?

The Camp Scarlet kids took it a step further and turned theirs into pendants. 


To do so, use fairly small rocks, and glue a bale (or pendant base--we found a package of 3 for about $3 in the jewelry making section of a craft store--use your 40% off coupon) to the back of your painted rock. When it's dry, just string it up. We used yarn, but you could certainly use cord and add a clasp (which you can also find at the craft store).


*******
We found these books helpful in our study of ladybugs:

This is a great book for explaining the ladybug lifecycle, with clear pictures and easy to understand text.  In fact, we read this book over and over with each new insect to remind the kids that the insect lifecycle is the same for every kind of insect.  I highly recommend this book.


Crawl Ladybug, Crawl! by Dana Meachen Rau

This is a very easy to read book with one picture plus a simple sentence stating a fact about ladybugs per page--great for kids who are learning to read.

The Grouchy Ladybug by Eric Carle

I just love Eric Carle books, don't you?  In this cute book, a grouchy, dissatisfied ladybug learns to be grateful for what he has.

Wednesday, May 30, 2012

Home Made (Buggy) Shrinky Dinks

You guys! You have GOT to try this! I've been wanting to make bracelets using shrinky dinks with my Camp Scarlet kids forever, but haven't been able to bring myself to actually buy shrinky dinks--that stuff is expensive. 

When I found out that I could make my own shrinky dinks for FREE using materials from my recycling bin, you can bet I spent the next several months obsessing about finding number 6 plastic (polystyrene). 

Ask Hubby.  He'll tell you.

When I mentioned to my sis the other day, that this was the day she...well, let's just say that she was unable to match my enthusiasm for the project.  She's only 6 years younger than me, but apparently the shrinky dink craze had diminished significantly by the time she was old enough for them. 

Well, whether you got in on the shrinky dink revolution as a kid or not, this is a not-to-be-missed experience, combining science, art, and that undeniable "wow" factor.  Are you ready?  Grab your number 6 plastic and let's get started!

The polystyrene that you're looking for is the clear, non-expanded kind.  I found it in take-out containers (not the Styrofoam ones, the clear plastic ones), tops of some bakery goods, a plastic tray from a package of cookies, tops of disposable aluminum baking pans, and disposable clear plastic plates.  Once you know what you're looking for, you'll start seeing it everywhere.  Just look for the recycling symbol with a 6 in the middle.

Polystyrene plastic bottle

One of the grocery stores near us has a salad bar, allowing one to fill a container with salad fixings, and charging by the pound.  Those containers?  #6 PS.  The cashier did look at me a little funny when I walked up with just a stack of clamshell containers with nothing in them, but she got over it.  I also made Hubby save the take-out containers from a dinner out on our spring break trip and haul them, first with us to visit the in-laws, and then all the way back to our house, a round trip of around 850 miles.  He got over it, too.


Once you've got your plastic, cut it so that you have a flat sheet to work with.  Draw on the plastic using permanent markers (we used Sharpies).  You can either draw freehand, or place the image you want to draw under the plastic and trace.  We found some cute line-drawing bugs to trace.


Cut out the shapes, leaving a bit of a border around the colored part, and rounding the corners.  If you want a hole in your finished shrinky dink, now is the time to punch it.


Place the shapes, ink side up, onto a foil-lined baking tray, and place in a 350* oven until they've stopped moving (if that sounds a little strange, just try it, you'll see what I mean). At this point, you (and the children) need to be glued to the oven door watching the dinks through the window--it's very entertaining.  They will shrink to about 1/3 of their original size and be 5 to 6 times thicker.  Ours took about 3 minutes.

Now you can do whatever you want with them.  The Camp Scarlet Crew decided that necklaces would be better than bracelets, but you could also attach them to a keychain, make them into a zipper pull, make a luggage tag, a guitar pick, or whatever else you can think of!


 To read more about the science of shrinky dinks, click here.  Have fun, my friends!

Tuesday, May 29, 2012

Ladybug Math (an addition file folder game)

Oh my goodness, I love file folder games.  Which is why it's a bit strange that I haven't made many, many more of them than I have.  However, when I saw this one over at Mama Jenn's blog, I knew I had to make it. 

Even not taking into account that it's a BUG, this thing is so.stinkin'.cute!  Added bonus: this file folder game is super easy to put together.  Oh, right, and educational.  That's the main reason I wanted to make it, of course.

 Just trace a bowl on red construction paper and cut it out.  Do the same with a glass on black construction paper, and glue 'em down to your file folder.  Add a black stripe and some eyes and you're set.  I covered my ladybug with clear contact paper to make it more durable.

 I cut apart a baseball card holder (don't tell MC!) to make the sleeve for the addition facts.  The top and left side are open to make it easy to slide the cards in.  You can even use a dry erase marker to write the answer on the sleeve and easily erase for the next card.

Mama Jenn suggested using a baseball card holder to hold the flashcards, but I ended up using a  No. 6 3/4 envelope, as you can see on the upper left side of the game.  I used a sleeve from the baseball card holder to hold the dots.

I used a 1" round punch to make the dots (thanks to a friendly Boy Scout for lending me hers), and you can print out the flashcards from here.

To play, simply choose an addition card and place it inside the pocket underneath the ladybug. Place the appropriate number of dots on each side of the ladybug, then count up all the dots and use a dry erase marker to write the total. Erase your answer and move on to the next card.

See?  What'd I tell ya?  Super cute, super easy, super educational.  Have fun :)


Here's what you need:

Thursday, May 24, 2012

BUGS! Glow-in-the-Dark Fireflies

I know I promised that ladybugs would be next, but we didn't get to them on Monday when Car was here, I was sick on Tuesday (so we didn't do anything), and Wednesday is my "day off".  Thursday dawned gray and rainy...
 and when the power went out, plunging us into semi-darkness, I decided it was a perfect day to work on fireflies (or lightning bugs, if you prefer).  They're just in time for Memorial Day picnics or camping trips, too.
This abstract looking thing is one of our fireflies, glowing in the dark.  Don't worry.  I've got some better pics--just not of it glowing.  Can you make out the antennae sort of in the middle/right, and the wings near the top on the left?
 In order to make a firefly, first we needed to know what they look like, so we read Fireflies by Nicole Helget.
This looks exactly like the pic above, doesn't it?
This book was written at a perfect level for my preschoolers, and would work for lower elementary as well.  It was interesting and informative--did you know that if frogs eat too many fireflies, they will glow in the dark?  My one complaint is that the typeface is all caps, which makes it a little difficult to read.

But, we found out what we needed to know, which is that fireflies have 2 eyes, 2 antennae, 6 legs, 4 wings, and a glow in the dark abdomen.  Then we set to work.


Supplies:
  • an empty 16 or 20 oz soda bottle, preferably green, with a cap (we found ours in recycling bins at the children's museum).
  • two beads
  • six pipe cleaners
  • construction paper
  • glue and/or tape
  • glowsticks (we used glow bracelets rather than glowsticks, because they were less expensive and I wanted the kids to have several chances to use their fireflies.  However, glowsticks will give a stronger glow)

Make It:
  1. Wash and dry your soda bottle and cap
  2. Paint the cap black, or color it with black permanent marker
  3. Glue on beads for eyes (I would recommend hot glue, but since our power was out, we used tacky glue)
  4. Twist 1 pipecleaner around the neck of the soda bottle, to form antennae
  5. Twist 3 pipecleaners around the body of the bottle to form 6 legs
  6. Twist the remaining 2 pipecleaners into 4 wings
  7. Replace the cap on the bottle, and arrange the legs, wings, and antennae so they line up correctly with the eyes on the bottle cap (legs down, wings and antennae up).  Glue or tape in place.
  8. Cut a piece of construction paper to go around the bottle and cover the leg pipecleaners, and tape or glue in place.
  9. Wait until dark, crack your glowstick, and place it in the bottle.

Aren't they cute?  These bugs will make a perfect nightlight for Roger on our next camping trip.

Saturday, May 19, 2012

(lady) Buggy Snacks

I am having waaaaay too much fun with buggy snacks these days.  You saw my a few of my caterpillars the other day.  Well, on Thursday I made ladybugs.  It's the kids' fault, really.  Well, let me just show you.  First I made these:
 Aren't they the cutest?  Just a half grape for the head and a strawberry for the body, with mini chocolate chip spots stuck into the berry.  I cut a line down the length of the strawberry to define the wings.  So yummy!
I made these as kind of an appetizer for lunch.  And they were delicious.  Strawberries and grapes?  I'm there.  Add chocolate to it?  Over the top.

The kids liked their ladybugs, too.  They liked them so much, in fact, that they requested ladybug sandwiches to go along with them.  What?  That was not part of the plan.

I'm not one to shrink away from a challenge, however (at least not a bug-shaped-food challenge), so I put my thinking cap on, broke out the bread, made these:
That's a peanut butter sandwich (but really, you could use any filling...although I'm not sure how ham, for example, would taste with the chocolate chips, which means if you use a more savory filling, you might want to sub black olives or something for the spots), cut with a circle cookie cutter.  I used one of the leftover corners for the head, and frosted it with some leftover chocolate frosting.  I added a black decorator frosting line to define the wings, and chocolate chip spots.

So there ya have it--a couple of buggy snacks. 

I'm not exactly sure how I'm going to make mosquito-shaped food for next week, but I'm working on it!

Wednesday, May 16, 2012

BUGS!--Butterfly Life Cycle

As I mentioned in this post, all insects go through the same life cycle, from egg, to larva, to pupa, to adult, and back to egg again.  Since the Camp Scarlet kids are getting a little older, I thought I should start being a little more intentional about injecting a little science into their experience, so during our entire BUGS! theme, I'm sneaking in little life cycle snippets, emphasizing that every insect goes through these four distinct stages in its life.

Earlier this week, we decided to make a visual representation of the butterfly life cycle.


First, I created the lifecycle document, just a circle divided into four sections, with arrows pointing around the circle (click here to print your own copy).  Next, from this website, I printed out the words for each stage of the cycle, using dotted lines for the kids to trace.  I cut them out and pasted one in each quadrant of the circle.

I cut a leaf out of green paper for our egg, and a branch out of brown paper for our pupa.  Then we set to work on our lifecycle, using our fingerprints and little stamp spots.  The kids traced each word, then added their fingerprints.

First, the egg, using just the tip of a pinky finger:

Next, the larva, or caterpillar, using the tip of an index finger:

Next came the pupa, or chrysalis, using the side of a pinky finger:

And finally, the adult, or butterfly.  We used thumbs for the upper wings, and index fingers for the lower wings.

I added a few details with a black marker and we were done :)


As an alternative to fingerprints, you can use pasta to diagram the butterfly lifecycle--use rice or orzo for the egg, a spiral pasta like rotini for the larva, shell pasta for the pupa, and bowtie pasta for the butterfly, as explained here.  Pasta is less messy, but fingerprints are much cuter :)

If you're looking for a good book to read about the butterfly life cycle, try Waiting for Wings by Lois Ehlert, which has gorgeous illustrations, and details the life cycle of 4 different kinds of butterflies.

Or The Very Hungry Caterpillar by Eric Carle is a great one, too.

Have fun!  Up next: ladybugs :)

Related Posts Plugin for WordPress, Blogger...