Showing posts with label Craft of the Month. Show all posts

Friday, November 30, 2012

Craft of the Month -- December

Well, my friends, the craft of the month club is coming to an end--thanks for crafting along with us :)

For December, enjoy these three snowy crafts:

Triangle Trees Snowy Scene


Bubby made this at school, and I thought it was so cute and easy that I should share it with y'all.
  1. Cut 3 large isosceles (two sides the same length) triangles from green paper. 
  2. Glue to a large sheet (18 x 9") of blue construction paper.
  3. Cut small squares or rectangles from brown paper.  Glue to form trunks.
  4. Using the end of a spool of thread and white paint, make snowflakes.

Cotton Ball Snowman
  1. Gather your supplies.  You will need: background paper (we used blue construction paper), cotton balls, something for arms (we used pipe cleaners but you could also use sticks), something for a hat and scarf (I cut them out of felt, but you could use paper), something for a nose (we used pipe cleaner), something for eyes, mouth, and buttons (we used plastic gems and buttons).
  2. Trace around 3 round objects of different sizes to make a snowman head, abdomen and body, on your background paper, or you can freehand a snowman outline. It’s better for the kids to have a guideline to fill in.
  3. Pull the cotton balls so that they’re flat and are 3-4 times bigger, and glue inside the outline.
  4. Add the stick arms and nose (pipe cleaners), coal eyes, mouth and buttons, scarf, hat, and pipe.

This is a fun activity to do while reading There Was a Cold Lady Who Swallowed Some Snow by Lucille Colandro.
Just borrow the book from the library (or purchase on amazon) and gather your supplies, but keep them hidden.  As the cold lady swallows each item, place the craft supply that represents that item on the table.  So when she swallows some snow, put the cotton balls on the table.  Then, when all the supplies are on the table, but before the big reveal in the book, ask the kids what they could make with those supplies.  Then, finish reading the story to reveal that the Cold Lady coughed up a snowman!
 
 
 Borax Crystal Ornaments
ka99703_hol02_snowflake.jpg
{Source}
Follow the instructions here to make your own borax crystal ornaments using pipe cleaners and borax (which can be found in the laundry aisle).

Use your imagination to come up with shapes--try snowflakes, stars, Christmas trees, hearts--anything you can think of.  You can add a few drops of food coloring to the borax solution to make colored ornaments.

Borax Ornament
{Source}
Happy crafting :)

Sunday, November 4, 2012

Craft of the Month -- November

Whoa.  It's November already.  Which means it's (past) time for another craft of the month post!

Craft up some Thanksgiving fun this month with these three crafts:

  1. Fold a piece of brown paper (approx 9x12) in fourths.
  2. Trace child’s hand on paper, leaving as much arm as will fit for a tree trunk. The fingers are the branches.
  3. Cut out all four layers at once (if it’s you cutting—if the kids cut, you probably want to trace their hands 4 times so they can cut each one separately).
  4. Glue each tree/hand to white cardstock that's been folded in half
  5. Use fingers dipped in paint to add red, yellow, orange, green, and brown leaves.
  6. When the cards dry, use them to send Thanksgiving greetings to friends and family.


  1. You can use real gourds, if you happen to have any, or for a more permanent craft, use simulated gourds from the craft store. 
  2. Figure out how to get the gourds to stand—you might try gluing on Popsicle sticks to make a platform, playdoh, maybe cutting off part of the bottom.
  3. Use feathers, googly eyes, pipecleaners, and whatever else you can think of to turn the gourds into turkeys—it might help to have a few pictures of turkeys available for the kids to look at.


Thankful Turkey PaperCraft

turkey craft
Click here for template


Click here for template


  1. Cut a turkey body from brown paper and several feathers from colored paper, either freehand, or choose one of the templates above.
  2. Glue the turkey together--if you used a template, follow its instructions.  If you're crafting freestyle, don't forget to add details like eyes, a beak and snood (that red thing that hangs down over the beak), and feet.
  3. Write one thing the child is thankful for on each feather--you can either do this all at once while you're crafting, one each day, or as ideas occur.

Wednesday, October 3, 2012

Craft of the Month: October

That's right, my friends, it's time for the October craft of the month post!  It is the first full month of autumn and my thoughts have turned to fun, spooky, cute creatures.  This month, craft up a cute little bat, a spider and web, and some glowing jack-o-lanterns.

TP Tube Bat--isn't this guy cute?  Don't you want to make one, like right now?


You will need a toilet paper tube, glue, googly eyes (mine are ~3/8"), white scrap paper (for fangs), brown paper, black or brown marker (optional)
  1. Leave the tube as is, if it's brown, or paint it brown or cover it with brown paper.  Just a hint on covering tubes with paper--use a lot of glue, and have some clothespins or other clips handy to hold the paper in place while the glue dries.  I chose to leave my TP tube au natural.
  2. To make the ears, fold over one side of the top of the tube, then fold the other side over it.  Basically, you're tucking one side of the tube under the other to end up with some pointy ears.  If you need more help with this step, my crafting idol, Valerie, has a good picture here (it's the 4th picture down) of what you're trying to do.
  3. Add googly eyes and fangs (small triangles cut from white paper)
  4. Optional: use a brown or black marker to draw nostrils on your bat.
  5. Trace hands on brown paper for wings, cut them out, and glue on the back.
And there you have it! 

Bonus: if you wish to animate your bat wings (make them flappable (is flappable a word?)), there are instructions here.  Looks to me like you could easily adapt the instructions to fit this little guy.

Pom pom spider and web--the kids and I made these spiders last year for our pinecone owls to chase.  Not only is this a cute craft, but it is a great way to sneak in some fine motor skills practice for your kiddos.

For the spider, you will need two pom poms (brown or black is classic for spiders, but wouldn't a hot pink spider just make you smile?), one larger than the other.  I think mine are 1.5" and 1" (but I could be wrong), googly eyes, and two pipe cleaners.
  1. Glue small pom pom (head) to large pom pom (body)
  2. Glue eyes to head.
  3. Cut 2 pipe cleaners in half
  4. Stack 4 half pipe cleaners together and twist together in the center. You should have 8 ends, which will become the legs.
  5. Shape each end into a Z shape for legs.
  6. Glue body to legs (use lots of glue and let it sit undisturbed until dry)

For the web, you will need a small, sturdy paper plate (like Chinet), and yarn (again, black is classic, but use what you have).
  1. Punch holes (about 8) around the outside of a small paper plate.
  2. Thread a length of yarn through one hole and tie in place.
  3. Lace the yarn through the holes in the plate, criss-crossing, until you’re satisfied with the web.

Recycled jar jack-o-lantern


Click the picture for instructions to make these delightful (ha, ha, punny) jack-o-lanterns using repurposed glass jars, glue, and tissue paper.

Thursday, August 30, 2012

Craft of the Month--September

The air is turning cooler and the leaves are beginning to turn color and drift gently to the ground. It's autumn--time to think about getting back to school and bringing in the harvest. September crafts of the month include a paper bag scarecrow, an egg carton school bus, and a fruit of the Spirit apple garland.

school bus craft
{Image Source}
Why not paste school pictures of your kiddos and their friends in the windows of this egg carton school bus?  You can find instructions here.

{Image Source}
Teach your children about the fruit of the Spirit by making this beautiful apple garland.  Visit I Can Teach My Child for instructions.

“But the Fruit of the Spirit is
love,
joy,
peace,
patience,
kindness,
goodness,
faithfulness,
gentleness,
and self-control. 
Against such things there is no law.” 
Galatians 5:22-23
 

{Image Source}

Protect your harvest of apples from marauding crows with this paper bag scarecrow craft.  He's oh so cute and won't leave hay laying around the house: click here for instructions and template.

***********

Bonus craft:
Make some fun crows to keep your scarecrow busy--here are a few possibilities, or make up your own :)

Plastic cup crow from Familycorner.com
{Image Source}
Cardboard tube crow from Kaboose
{Image Source}
Hand and Footprint Crow Craft
Handprint and footprint crow from DLTK
{Image Source}


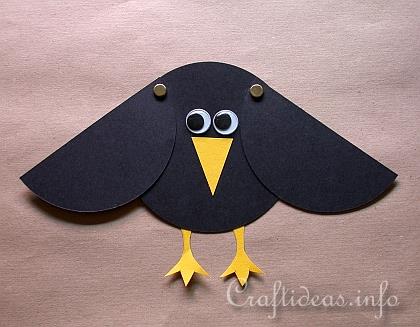
Paper Craft for Kids - Paper Crow with Movable Wings
Paper crow with movable wings from Craftideas.info
{Image Source}


Have fun crafting!

Monday, August 27, 2012

The Kissing Hand Back to School Crafts

OK, so I know that a lot of you are back to school already, but we've got a week to go.  And, oh what a push it's been to get everything finished that needs to be finished.  I'm sure you can relate.  Or not.  Whatever.

Our nephew is heading off to kindergarten this fall, and his little brother is starting preschool (they call it 3-school where they live, which is descriptive, I guess, but it always throws me for a bit of a loop when they call it that.  Here (and everywhere else I've ever lived), it's preschool.  Just preschool.  And then sometimes they call the 4 yr old classes pre-K, I think to make themselves feel important.  Anyway...).  Big month in the D household.

Ua had some separation difficulties when he was in 3-school, and I know his mom is feeling a little apprehensive that it'll continue in kindergarten.  And I am no stranger to school and separation issues.  My poor little AKD cried every.single.day of kindergarten for about the first 2 months.  It wasn't pretty, but I didn't know what to do to ease his anxiety.  If I had known then what I know now...but I digress.

So I sent the boys a couple of back to school crafts based on The Kissing Hand by Audrey Penn.


The Kissing Hand is a lovely story about Chester the raccoon starting school for the first time.  He's not sure if he'll like it and is feeling anxious and worried about how it'll go.  His mama reassures him, and then shows him a family secret: the kissing hand.  Mama lovingly kisses Chester's hand and tells him that whenever he's missing her, all he needs to do is hold his hand up to his cheek for a kiss and to remember that his mama loves him.

It really is a sweet story, just perfect for little ones who are separating from their parents for the first time or trying something new.

I sent the boys a copy of the book, then had them make shrinky dink kissing hands to keep with them at school, attached to their backpacks.  They made extras for Mom to keep with her as well :)


To make your own, follow the instructions here to use recycled plastic OR use blank shrinky dink material--you can find it at craft stores or online.

I also sent this free printable Kissing Hand poem that I found on Pinterest. 
 
It reads:
Here's a special thing to do
When I am scared of leaving you.
Hold my hand, then kiss it here.
The kiss will help to keep you near.
It will help me through my day
So I can work and learn and play.

Just print, cut out, and glue to one side of a piece of paper.  Next paint the child's hand, and place it carefully on the other side of the paper (or just trace the child's hand).  Cut out a red construction paper heart and glue it in the center of the handprint.

Have fun making your Kissing Hand crafts, and best wishes for a terrific school year!

Wednesday, August 1, 2012

August Craft of the Month

Well, it's August.  Time for a new craft of the month post.  I actually managed to put together all of the crafts for the rest of the year (*whew* seriously, huge weight off my shoulders!  I have thoroughly enjoyed giving this gift to my nephews, but it was a lot of work, and I'm so glad to be done) and deliver them to my sis in mid-July.  Unfortunately, this means I don't really remember what I gave the boys to do!  I mean, I don't have to think about it anymore, so I'm not.  Thinking about it.

But never fear!  Pinterest to the rescue!  Yay, Pinterest!

August crafts of the month include Shape Sailboats, Aluminum foil river with bottle cap boats, and a TP tube apple tree.  Just click the pictures for instructions.


For the shape sailboat, I instructed the boys to make a background using a couple of different shades of blue paper and tissue paper for the water, and some cotton ball clouds.  If you prefer, you could sponge paint a lake and some clouds.  I think I even told them they could draw some letter m seagulls in the air.


Doesn't this look like fun?  I got the "Tinnissippi River" idea from Family Fun Magazine, but couldn't find the idea posted on their website (they wait a while to post projects from the magazine to their website, I think so people actually buy the magazine instead of just looking at all the projects online), but I found this picture on Filth Wizardry.

I suggested the boys make sails for their bottle cap boats using a length of drinking straw or toothpick for the mast and a paper triangle for the sail.  The sails can be attached to the boats with clay or playdough.


Apples are one of my favorite parts about late summer and fall, and apples are an important crop where my nephews live.  This Apple Tree is so easy and cute, and would be the perfect project to make upon returning home from the apple orchard.  The Happy Home Fairy even includes a template, if you're not confident in your ability to cut out your own tree top freehand.

Thursday, June 28, 2012

Craft of the Month--July


{Image Source}

Well friends, it's July and summer is in full swing.  It's time to celebrate with some fun activities that can be done indoors or out.

July crafts of the month include: sidewalk paint fireworks, blow paint monsters or fireworks, and bike decorating.

Monday, May 28, 2012

Craft of the Month--June

Here are the Camp Scarlet's Craft of the Month projects for June:
Homemade Sidewalk Chalk, Mega Bubble Blower, Homemade Slime

Saturday, April 28, 2012

Craft of the Month--May

Camp Scarlet's May Crafts of the Month include:
Number sequencing caterpillar, footprint butterfly, handprint tulips

Wednesday, March 28, 2012

Craft of the Month--April

April is all about spring time and celebrating new life.  Here's what's coming in April for Camp Scarlet's Craft of the Month Club:

~ Egg shell mosaic cross
~ Sponge painted chicks  
~ Baby bluebirds in a nest


Monday, February 27, 2012

Craft of the Month--March

Here's what's in store for Camp Scarlet's Craft of the Month Club for March:
Seuss-creatures, Painted Shamrock, and paper plate Lion & Lamb

Monday, January 23, 2012

Craft of the Month--January

Some time ago, I reported about a trip I took to the craft store looking for gifts for my nephews.  Didn't buy a darn thing, but I did leave the store with the most inspired idea I've had in a long time.  See, my sis had mentioned her boys might like craft kits for Christmas (Chip claims she's craftitudinally challenged and therefore needs kits in order to do crafts), so I was looking for craft kits, but everything I saw, I thought, well I could put that together for less than that.  Or, if I was going to make that thing, I would use this other material.  I just couldn't bring myself to buy any of them.

And that's when Camp Scarlet's Craft of the Month club was conceived.  Each month, the boys receive supplies and instructions for one or more seasonal crafts.

So much fun!  Don't you think that's a great idea?  The boys like to do crafts, their mom thinks she can't come up with crafts for them to do.  Plus?  It's the gift that keeps giving--every month, in fact (not sure if I can keep this up for a whole year, but we'll see).

Related Posts Plugin for WordPress, Blogger...