Thursday, November 15, 2012

Polvorones de Canele: Spanish Cinnamon Cookies

AKD is getting close to the end of his 12 weeks of Spanish instruction, and the other day they had a fiesta.  Remember that?  On party days in foreign language class, you were supposed to bring in a food to share from that country?  Only back then it was in 9th or 10th grade that we were taking our first year of a foreign language.

Anyway, he mentioned briefly, on Friday, I think it was, his desire to bring some of our homemade salsa and homemade tortilla chips to school for the fiesta.  I was kind of surprised that he wanted to bring salsa, considering that it's very spicy, and he doesn't like it, but I was willing to let him have some.  On Monday, he mentioned it again, this time saying, I need it tomorrow, mom.

Uh, son, if you need it tomorrow, you're plum outta luck, because you needed to do more than just mention it if you wanted me to actually buy some tortillas for you to make into chips.

Faced with my unwillingness to go out right then and buy tortillas, and his own unwillingness to make tortillas from scratch, AKD went to plan B, which was to search for Spanish desserts online that are both easy to make and for which we already had all the ingredients.

Here is what he found, and oh my, they are so simple to make and so delicious.  Well, I mean, what's not to like about butter and sugar and cinnamon, all baked up in a tasty flaky nugget of Spanish goodness?

Polvorones de Canele (Cinnamon Cookies)

A Mexican-style cookie rolled in cinnamon sugar

1 cup butter


Wednesday, November 14, 2012

My Hero

After over a week of soaking, followed daily by intense scrubbing at the food burned on to it, I feared my beloved 5 qt stock pot/steamer was headed toward the landfill, or at least the craft cupboard.  When suddenly, an unlikely hero swooped in to save the day.

Behold, the humble baking soda--the protector of laundry, the whitener of teeth, the raiser of baked goods, the bane of stains everywhere: from this most ordinary and overlooked of household chemicals, salvation came.


Thank you, baking soda.  Despite your lowly accommodations in the door of the fridge, you have my undying admiration and unending praise.  All hail baking soda: savior of the stock pot from certain doom.

Tuesday, November 13, 2012

This is how it will be

"This is how it will be," the little voice in the back of my mind whispered softly as I stumbled out of my cozy warm bed and into the darkness in search of the small voice calling, "mama!" in the middle of the night. 

We've known for some time now that our middle and youngest children can no longer share a bedroom.  Every morning, beginning at 6 a.m. or even earlier sometimes, we hear them yelling, hear doors slamming, as they egg each other on into wakefulness.  We've told them not to leave their room until 7, and they are incapable of being awake and not waking their brother.  They are incapable of coexisting peacefully during that time.  They are, all at once, best friends and worst enemies.  They need to be separated.

But how?

We have four bedrooms, two on the main floor, currently the master and guest bedrooms, and two in the basement, where the children sleep. It works so well to just have all the kids downstairs and the grown-ups upstairs. Well, at least until the yelling starts.

We are finally ready to give up our guest room to one of our children--we (well, mostly I) have resisted this change for years, ever since MC was conceived almost 10 years ago and we decided to have this new child share his older brother's bedroom.  We live far enough away from family that, when they visit, they stay, not just for a few hours, but for a few days.  And since I am a private person, and prefer to have my own space, I wish to provide a comfortable, private space with a door for our guests.  It is slightly ridiculous, however, to reserve a space solely for guests, when that space is used by guests perhaps 10 days a year, when our bickering children are driving me insane.

We decided to bring Bubby back upstairs, and he is all on board with that suggestion.  The trouble is, apparently our precious (5 year old) baby boy doesn't really sleep through the night anymore.  We heard stories of him waking his older brother in the middle of the night, because he needed to go to the bathroom, or he heard a strange noise, or he just wanted someone to talk to, but I don't think we quite realized what this would mean for us, bringing him upstairs.

Last night, he woke me at 12:37 a.m. and 4:30 and he was still up before 6, all of our children were.  What is up with that?  And the youngest two found each other and started in on their bickering, the taunting and kicking and pinching and hitting.  The only difference in this scenario was that I was dealing with all of that without having had a good nights' rest.  This is not a recipe for a happy mama.

I guess those boys are in for a little re-training in the area of staying in bed, because they can no longer live together, and I am not willing to begin my day of mommy-ing before 6 a.m. after being woken in the night.  Those days, the days when I could function with spare, interrupted sleep, are loooong past.  And honey, it is not pretty when I am put in those circumstances.  It is just not going to work long term.

This is how it will be.  But not for long: the boys will be quickly re-trained, and it will be worth a few nights of lost sleep to gain an extra hour or two of genuine rest and peace in our days.

Monday, November 12, 2012

10 Things--How To Declutter--Practical Matters

Last week I mentioned my goal to get rid of 10 things every week day until the end of the year.  I'm doing this because I have noticed a creeping feeling of oppression every time I look around at all of this stuff--stuff that I need to spend time dusting and cleaning around and maintaining, stuff that I don't want and we don't need, stuff that weighs me down.  I'm doing this because I want to experience the freedom and peace that comes from taking control of my belongings, instead of letting them control me.

I'm doing great so far, and in fact, I've exceeded my 10 things each day for the past 2 weeks.  On Friday, the nice folks at Courage Center will be picking up my first load of stuff.  And y'all!  I'm just getting started!  It's been a mixed bag of emotions, but it's a positive change, for sure.


In case you'd like to join me in this effort, I thought I'd let you in on a few tips for decluttering.

Once you've started decluttering an area, do not leave until that area is done. With that said, an area can be as small or large as you want it to be: one shelf,  a closet, or an entire room. Stick with it until it's done.

To accomplish this, bring 3 boxes or bags with you: one for items that need to be relocated to another room (because when you have children things tend to migrate), one for items to be donated or sold, and a third for items to be thrown away.  You could include a fourth box for items to be given away to a friend or family member.  This is important, because it's all too easy to get distracted by putting items back where they belong, or running to the trash every few minutes. 

For advice on figuring out where in your home to start decluttering first, check out this post from Ready. Set. Simplify.

As you're decluttering, ask yourself these questions about each and every item:  Is it useful?  Is it beautiful?  Has this been used in the past year?  If it isn't useful or beautiful, and you haven't used it in the past 12 months, why are you dedicating space to it in your home?

For a few more questions to consider as you're sorting through possessions, check out Mandi's post, 10 Questions to Help You Declutter.

To keep yourself on track, set a deadline.  If you're planning to have a garage sale, schedule it now--decluttering needs to be completed by then.  My deadline is the end of the year at which time I'll decide whether I want to continue.

My last piece of advice is to grant yourself some grace.  You didn't amass all of this stuff in one day, and you won't be able to get rid of it all in one day, either.  Each and every effort in this endeavor, no matter how small, is worthwhile.  If you're not sure about something, put it in a maybe box or pile to decide later.  Chances are when you come back to it, you'll have a clearer idea whether it's something you really want to keep or if it's something you can release.

Have you been inspired to join me on this decluttering journey?  Leave a comment to let me know how you're doing.

To read all of the posts in my 10 Things series, click here.

Sunday, November 11, 2012

Nutcracker

Usually it takes me a while to choose a book to review.  I see a couple that look interesting, and I read the descriptions, then go back and read them again, finally making my choice after several minutes of consideration.  But when I saw that Nutcracker by E.T.A. Hoffmann, illustrated by Maurice Sendak was available to review, I didn't hesitate: I immediately clicked, "send me this book."

 
I was so excited for this book to arrive.  Our family has a tradition of using books to count down to Christmas, reading one each day in December.  I figured this would be the perfect addition to our collection.
 
I was not anticipating the length of the book, however.  I figured it was a picture book, the story of the Nutcracker, greatly abreviated, meant for reading aloud to children in one sitting.  It is, however, the entire text of E.T.A. Hoffmann's fairy tale, "The Nutcracker and the Mouse King," translated by Ralph Manheim and illustrated by Maurice Sendak.  I say this by way of letting you know that after I saw it, I was expecting to not like the book.  But I was pleasantly surprised to find myself charmed by this lovely volume.
 
The story is engaging for all ages and masterfully translated from the original German text.  Fans of Maurice Sendak (Where the Wild Things Are) will recognize his distinctive style in the beautiful illustrations.  I read the book aloud to my 5 year old son, a chapter or two at a time over the course of a week or two, and he stayed engaged in the story the entire time, even asking for more when each chapter was done.
 
Nutcracker was definitely not what I was expecting, but I loved it, and this delightful edition will make a lovely family keepsake, and perhaps a new family tradition.
I received this book for free from WaterBrook Multnomah Publishing Group in exchange for my honest review.
 
Did you like this review?  Please take a moment to rank it below:
 

Friday, November 9, 2012

In Between


We are in an in between time, Bubby and I.  It seems like we've been here forever...and it's true, we have been here an extraordinarily long time: two years or more.  I refer to that time in between napping and not napping--the gray area where if he takes a nap during the day, he won't be able to fall asleep at a reasonable time in the evening, but if he doesn't take a nap during the day, he is completely irrational and inconsolable from about 4 p.m. on. 

It isn't like this every day.  Some days, he's OK without a nap, but we can never tell which kind of day it will be until it's too late to intervene.

What's a mama to do?  It's an impossible choice--there are no winners here.

This in between time is new for me.  With my oldest two the transition from nap to no nap was accomplished quickly, with little angst, on their part at least.  Their mama wasn't quite as ready as they were to give up nap time.

I know this in between time will pass--phases like these always do--but right now?  It is rough going.  My patience, worn thin by more than 12 years of children rubbing up against it all day, every day, has gone the way of the Ivory-Billed Woodpecker, a north American bird so endangered it may already be extinct.  I would say I'm not sure how much more of this I can take, but in reality, I know we'll endure for how ever much longer we need to.  But it won't be pretty.

How about you?  Are you in an in between time?  How do you cope?

I've shared this post with the Parent 'Hood.  Come on over and join us.

Thursday, November 8, 2012

Roasting Pumpkins

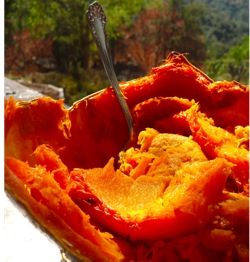
This time of year, I'm craving all things pumpkin: cookies, bread, muffins, shakes, soup, even pie.  To feed my pumpkin habit, I need some pumpkin.  And of course I could just go to the store and buy some pumpkin-in-a-can.  That works.  But one of AKD's friends brought over some pie pumpkins for us, so we made our own fresh pumpkin puree.

scooped out small pie pumpkin
{Source}
Here's how. 
  1. Obtain a pie pumpkin.  Yes, there is such a thing.  They're generally smaller and have more pulp with less seeds, and tend to taste a bit sweeter.  They should be on clearance right now at your grocery store or the farmer's market (if your farmer's market is still open).  If you can't find a pie pumpkin, any pumpkin will do.
  2. Wash the outside of the pumpkin.
  3. Cut the pumpkin in half and scoop out the seeds.  Don't worry about getting all of  the stringy stuff out.
  4. Place the pumpkin halves, cut side down, in a baking pan with a rim and add about 1/4 inch of water in the bottom of the pan. 
  5. Roast at 350* F until tender.  How do you know if it's tender?  Turn it over and stick a fork in it.  Ours were large-ish, as far as pie pumpkins go, and they took about an hour and 15 minutes. 
  6. When they're tender, scoop the flesh out and puree in a food processor or blender until smooth.
{Source}


That's it!  So easy!  We used some fresh pumpkin puree to make a pie (and it was an extraordinarily delicious pie), and froze the rest in 1 cup portions for future use.  One 16 oz can of pumpkin equals about 2 cups.

Wednesday, November 7, 2012

How to make a plush (non) Ducky Momo: a (non) tutorial

Meet Ducky Momo.


He's a character on Disney's Phineas and Ferb.  On the show, he's actually some girl's stuffed animal.


And that's all I know. 

Three weeks ago, I didn't even know that.  Three weeks ago, one of my Facebook friends posted a pic and asked if any of her friends knew how to make it.

I saw the picture and it didn't look too difficult, so I thought I'd help a friend out and find a pattern for her.  I was intending to just give her the pattern for someone else to make.  But I couldn't find a pattern.  A n y w h e r e.

And if you are reading this post, you're probably in about the same boat as I was.  Searching "ducky momo pattern" 'til your fingers revolt and finding...well, at least now you've found this :)  I'm here for you, friend, even if we've just met.

Anyway, I couldn't find a pattern, but I love a challenge, and especially in these days of mothering in the trenches it is so gratifying to have something creative to do that has nothing to do with my kids.  So, I told her I'd make one.

Meet my non-Ducky Momo.
I'm not quite sure how to take this, but when my Hubby saw the finished Ducky he said, "I'm impressed, that's actually kind of cute."  Well, ok.

Before we go any further, I'd like to point out that this is not Ducky Momo.  He's totally different.  His feet are smaller, his legs are longer, his beak doesn't have stitching, his wings are pointed the wrong way, and his tail is longer and shaped different than Ducky Momo.  The slits in his eyes are narrower and point slightly to the side instead of straight down, and the eyes are closer together.  Oh, and the crown is bigger, too.  I say all this because the nice lady at the fabric store told me that in order to not be in violation of copyright laws, my product has to be at least 10% different from theirs.  Believe me, it's different.  And I'm not selling it.  So don't come after me.

Now that that's out of the way...

This isn't a tutorial; I'm not going to tell you how to make this thing.  I'm assuming if you're online searching for a Ducky Momo plush pattern or tutorial you kind of have an idea how to make something like this already.  So I'm just going to tell you where to get the pattern pieces, and you can put it together.  K?  K.

{Source}
All right, so for the body, I used the body from this free octopus pattern.  I cut the pattern piece in half length-wise and added 2 inches.  Then I cut it in half width-wise and added 5 inches.  The bottom is a 6.5 inch diameter circle that I drew in Microsoft Word.  For these I used a 1/2 inch seam allowance.

Lizzie Love version of DUCKY MOMO - Candace's Favorite Toy from Disney's Phineas & Ferb - Plush Softie
{Source}
 
For the wings and tail, I printed this picture from an etsy listing, traced around the outlines and enlarged them 225%.  I put them together adding seam allowance like this.

For the beak, I used the bottom beak pattern piece from this adorable free platypus pattern (guess what my next project will be)
Image for Plattie The Platypus DIY Craft Project
{Source}
 
The feet were also from the platypus pattern, but I enlarged it 150% (and I don't think they're quite big enough).

The white part of the eyes were a 4.25 inch diameter circle and the black part was a 1.25 inch circle (I traced the cap of a bottle of sprinkles).

The crown piece is a 13 x 1.5 inch rectangle with six 2-inch wide by 1.5 inch high rectangles centered on it.  I incorporated a half inch seam allowance onto the bottom and sides, and used the technique explained here to add seam allowance to the top triangles.

The finished non-Ducky is about 12 inches high, and maybe 8 wide?  I forgot to measure him.  I used 1/2 yard of yellow fleece, 1/8 yard each of orange and white fleece (if you have scraps, you probably have enough), and a scrap of black felt--add a couple of spools of thread and some fiberfill, and he cost about $10 to make. 

If you run into problems, feel free to comment below or contact me through my contact page and I'll see if I can help.

Happy sewing :)

Tuesday, November 6, 2012

Tuesday's Tip: Fixing Funky Towels

Apt. 9 Highly Absorbent Solid Bath Towels
{Source}
Several months ago I noticed that our towels were getting a little...funky.  Maybe you've experienced this too?  They just smelled, well, gross.  And it was gross to think of drying myself off with these funky smelling towels.  The problem was, they never really dried, and the longer towels stay damp, the more chance they have to develop off odors.

Turns out that, over time, build-up of detergent and fabric softeners can cause towels to lose their absorbency, making them take longer to dry.  Ironically, the thing I was doing to make my towels smell good, washing them with fabric softener, was causing them to smell funky.  Ugh.

Not to worry, though, it's a super easy fix.  All you need is hot water, vinegar, and baking soda.  A washing machine is a big time saver, but is not necessary.

First, wash the towels in hot water, with no detergent, adding 1-2 c. (depending on the size of your load) of vinegar to the rinse water.  Then, wash the towels again in hot water, adding 1/2-1 c. of baking soda (make sure it dissolves) to the rinse.  Dry the towels completely.

That's it!  Funky odors are banished.

Our bath rugs were also smelling a little funky, so I used this technique with them as well.  Worked like a charm.

So, um, if you've experienced funky towels, could you please leave a comment to let me know I'm not alone in this?  Feel free to use a fake name...

Monday, November 5, 2012

10 Things

If you're feeling a little ...unsettled... (or maybe you would label it cRaZy or frazzled or weighed down) because of excess stuff, as ...ahem... *someone* around here may or may not be feeling, I have a simple suggestion for you.  It is by no means a new concept, but I was reminded of it again the other day while blog-hopping, and I thought you might find inspiration in the sharing of it.

The simple suggestion is to get rid of 10 (or more) things every day.  Ten things?  In the midst of all of this abundance?  Totally do-able.  I can totally find 10 things to get rid of today.  And tomorrow.  And the next day.  And probably, every day for the rest of my life, as the seasons of my life change, as my interests change, as my needs change.  And you can do it, too.
The spoils of one day's hunt in the kitchen drawers for at least 10 items to discard.
Not included in the picture are the 18 gazillion too-short-no-eraser pencils and 13 gazillion dried-up ink pens that went straight in the trash :)
I started about a week ago, and my goal is to get rid of 10 things every week-day until the end of the year.  That's 50 things a week: 450 things over the course of 9 weeks.  I feel so strongly about this that for the next 9 weeks, getting rid of 10 things will be item number 1 on my 3 item to-do list every day.  After that, I'll see where I am mentally and emotionally--I predict a drastic improvement--and I'll decide whether to continue.

I'm going about my anti-treasure hunt freestyle, picking an area that bugs me each day and sorting and organizing just that small area, and being ruthless in my purging, but if you would prefer a little more guidance, check out Keeper of the Home's 8 Weeks to a Less Cluttered Home PDF guide

(Eight weeks!  You know what's in 8 weeks, right?  Christmas!  What a perfect Christmas gift to give to yourself and your family--a less cluttered living space). 

Just spend 30 minutes or less organizing one of the listed areas each day, and look for 10 things to sell, donate, or throw away.

Ahhh...I feel lighter already :)

Sunday, November 4, 2012

Craft of the Month -- November

Whoa.  It's November already.  Which means it's (past) time for another craft of the month post!

Craft up some Thanksgiving fun this month with these three crafts:

  1. Fold a piece of brown paper (approx 9x12) in fourths.
  2. Trace child’s hand on paper, leaving as much arm as will fit for a tree trunk. The fingers are the branches.
  3. Cut out all four layers at once (if it’s you cutting—if the kids cut, you probably want to trace their hands 4 times so they can cut each one separately).
  4. Glue each tree/hand to white cardstock that's been folded in half
  5. Use fingers dipped in paint to add red, yellow, orange, green, and brown leaves.
  6. When the cards dry, use them to send Thanksgiving greetings to friends and family.


  1. You can use real gourds, if you happen to have any, or for a more permanent craft, use simulated gourds from the craft store. 
  2. Figure out how to get the gourds to stand—you might try gluing on Popsicle sticks to make a platform, playdoh, maybe cutting off part of the bottom.
  3. Use feathers, googly eyes, pipecleaners, and whatever else you can think of to turn the gourds into turkeys—it might help to have a few pictures of turkeys available for the kids to look at.


Thankful Turkey PaperCraft

turkey craft
Click here for template


Click here for template


  1. Cut a turkey body from brown paper and several feathers from colored paper, either freehand, or choose one of the templates above.
  2. Glue the turkey together--if you used a template, follow its instructions.  If you're crafting freestyle, don't forget to add details like eyes, a beak and snood (that red thing that hangs down over the beak), and feet.
  3. Write one thing the child is thankful for on each feather--you can either do this all at once while you're crafting, one each day, or as ideas occur.

Friday, November 2, 2012

Beautiful Picture Ornaments

One of my favorite Christmas traditions is to give ornaments to each of my children and our four nephews.  Every year I try diligently to match the ornament to their interests or accomplishments in the past year.  For instance, the year Bubby took his first steps, I gave him a first steps ornament, and one year I gave Con-Man a cookie monster ornament because he had a beloved cookie monster stuffed toy.

It's a little difficult, actually, to match the ornaments to our nephews interests because we don't see them often (a situation about which I am very sad), but I'm just so excited about the ornaments I made this year for our nephews who live in Colorado.

And now, if you happen to be one of our nephews who lives in Colorado, you should probably stop reading, because I don't want to spoil the surprise.  Just know: you're going to love them.
 
We were able to spend a week in August with my brother and his family, and we had such a great time.  Click here to read a little bit about it.  We spent some time with them visiting Pike's Peak and the Royal Gorge, and I knew before we even left for home what I wanted to do for ornaments this year.

I was planning to make them, because I was pretty sure I wouldn't be able to find what I was looking for commercially.  Imagine my dismay when I discovered that my favorite craft store no longer carries the crucial elements to accomplish my plan.

I didn't know what I was going to do.

And then I remembered ArtsCow.  They will personalize just about anything with your photos, Christmas ornaments included.  Here's what I came up with:
 Ty-Guy's says, "I (just barely) survived the Royal Gorge Bridge."  It's the highest suspension bridge in the world, and Ty-Guy was having a great time pretending to film himself plunging to his death by holding his mom's camera over the edge and zooming in while screaming and filming the whole time.

Con-Man's says, "Pike's Peak Bigfoot X-ing 2012."  We were all charmed by this sign as we drove the road up Pike's Peak, and Con-Man even bought a Bigfoot Xing sign to put on his bedroom door.


So cute--these ornaments are perfect, and a lot less cheesy than my homemade versions would have been.

Know what's even better?  Now through November 23, you can get two personalized photo ornaments from ArtsCow for $4.99 shipped.  That's less than you would pay for one un-personalized Christmas ornament in a retail store.  Or choose double sided ornaments for $6.99, still with free shipping.  Oh, and you can make an unlimited number of ornaments, all at this low price.  Just be sure to enter the promo code OURXMASOR at checkout to see the discount applied.  Make some for your kids' grandparents, their teachers, and all the children in your life, and don't forget to make a few keepsakes for your own tree.  This is an amazing deal.

Plus, this is my referral link.  If you sign up through my link and make a purchase, you will receive 1800 free photo prints credits AND 6 free photo books (and I'll get some fun rewards, too). 

So what are you waiting for?  Get started on your photo ornaments today :)

Thursday, November 1, 2012

The best whipped cream frosting


I just have to tell you about the frosting I used for my batty cupcakes. My friend J told me how to make it, and it is just divine. This endorsement is coming, you understand, from a woman who doesn't like frosting. Or cake. When I must eat cake I usually scrape off and leave half, if not more, of the frosting behind. But this frosting is light and fluffy and not too sweet--definitely worth trying, my friends!

So all you need is heavy whipping cream and a box of Betty Crocker Homestyle Fluffy White frosting mix. Probably any box frosting mix would work, but Betty Crocker is the brand my grocery store carries.
Whipping Cream Heavy (Pint)

First, whip the whipping cream, using cold beaters and bowl. J uses a quart for a box of frosting. Just keep whipping until peaks form--I wasn't watching the clock, but I'd say it was about 5-10 minutes with my hand mixer. Then beat in the frosting mix ...and... you're done.

I mixed some oreo cookie crumbs into mine and then piped it on top of the cupcakes. I just made half a box (3/4 c. mix) with a pint of cream, and had plenty to generously ice my 12 cupcakes, plus about a cup extra, which I froze for future use.

If you're thinking, well this is really just sweetened whipped cream used as frosting, then you're right, sort of.  Except the frosting mix contains stablilizers that allow this frosting to retain its shape and consistency, unlike sweetened whipped cream.

Try it--you'll love it!

Wednesday, October 31, 2012

Perfect (punny) gift for a male teacher

Have you noticed that a lot of the teacher gift ideas out there on the inter-webs are kind of...girly?  Go ahead, do a google search right now for "teacher gift" and see what pops up. 

I can think of a dozen fun things to give to a female teacher right off the top of my head, but for my son's male teacher?  I got nothin'.  Especially since I don't like to give food gifts.  Call me sexist, but for some reason, I can't see Mr. O enjoying a gift of homemade fizzy bath salts...maybe his wife would...

Anyway, we had MC's conference the other day, and Mr. O revealed that he loves Transformers.  He's about our age, and I remember all the boys being way into Transformers when I was a kid, so it makes sense.  That got my brain's wheels turning and here's what I came up with.


I got this fun Transformers Kre-O set (which is kind of like Lego) for free using a coupon last year around Christmas time.  It's Optimus Prime (who is the leader of the good-guy transformers, just in case you didn't know), and while the figure doesn't transform per se, you can build either a robot or a truck with it. 

You can see where this is going, right?  Oh yes, it's a pun.


It says,
"Thank you
for inspiring MC to
TRANSFORM
his mind!"

For this particular transformer, Optimus Prime, I'm tempted to add something like, "...TRANSFORM his mind for OPTIMUS learning."  I'll have to ponder that one for a bit.  I bet, if you looked hard enough, you could even find a Transformer font to use (I used Elmore)...

If you can't find a Transformer Kre-O set, no worries--anything from the Transformer genre will work--all the better if it's a puzzle or game the teacher can use in his classroom.  Even stickers or a rubber stamp would work. 

Happy teacher gifting, friends.

Tuesday, October 30, 2012

Bubby's Batty Birthday

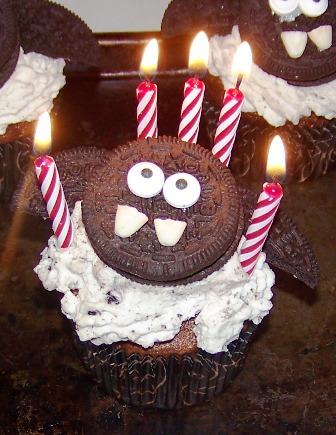
My baby turned 5 on Monday.  I am so blessed to be his mommy and so thankful that he is a part of our family :)  We celebrated with some batty cupcakes.


Remember when I posted a picture of batty cupcakes in this batty craft post?  IrishMomLuvs2Bake used chocolate wafer cookies for the bat's wings and ears, but y'all!  My grocery store wants $4.99 for a package of chocolate wafer cookies!  Which is about $2.99 more than I wanted to pay.  So I just used oreos for the wings and we decided we didn't need ears.  Still super cute, right?  The fangs are the bottom white part of candy corn--isn't that clever?  Oh, and I must say, if you don't just happen to have candy eyes sitting around, I'm sure m&ms or skittles would work just fine.


Five candles for our five year old birthday boy!

 He wanted to tell us what he wished for, but MC wouldn't let him--MC kept interrupting and eventually Bubby gave up!
Yum!

Happy Birthday Buddy!  I love you around the earth 20 thousand million hundred times and to the moon and back 2 thousand 44 hundred times :)

Monday, October 29, 2012

Basic Cake-Pop instructions (and our Halloween Cake Pops)

As I mentioned in this post, several months ago, I became obsessed with making cake pops.  I mean, what could be more fun than cake on a stick?  OK, I can think of a lot of things that would be more fun, but you've got to admit cake pops are pretty fun.  And they're so easy to make, really.
 
So I mentioned to my mustache friends that we should get together and make Halloween cake pops, and I was looking for a good basic explanation online of how to make them (because my friend J was the only one among us who had made them before), and didn't really find any.
 
So, my friends, here you go.  Basic cake pop recipe plus some Halloween cake pop inspiration.
 
First, bake a cake and let it cool.  Any flavor will do. 
 Next, crumble the cake into a bowl--you're looking for a fine crumb.  Use a large bowl, because for some reason, cake gets bigger when you crumble it. 
 Then, add a 16 oz can of frosting to your cake crumbs and mix well.  Again, any flavor will do.  You don't have to use your hands, in fact, I would recommend against it--but it seemed like the thing to do at the time.
 Finally, roll the cake mixture into balls.  I knew y'all were going to ask me how big the balls should be, and here's what I have to say about that--make them however big you want them to be.  Mine were about 1.5 inches, and I got 30 of them from one cake, but J's (the expert) were larger, like about 2 inches.  Then stick your cake balls in the freezer to firm up.

Give 'em an hour or two, or four, just let them get nice and firm.

Then melt some chocolate, almond bark, or candy melts in the color of your choice.  Take a lollipop stick (mine were 6 inches long), and dip it about half an inch into your melted goodness.  Then, gently, using a swirly motion, poke the stick about half an inch or more into your cake ball.  Once all of the cake balls have a stick in them, put them back in the freezer or refrigerator or out on the screen porch for a bit to firm back up.

Now for the moment of truth: dip the cake ball into your melted yummy stuff and gently spoon it over while turning, to cover completely.  If it falls off and it can't be salvaged, no worries--just put it on the "failure" tray for sampling while you work.  Um, yummy :)

Remove the cake ball from the melted stuff and hold it over the bowl while slowly turning to allow excess to drip off.  When all the excess drips off, or you get tired of holding it, you can place the stick into a sheet of styrofoam to hold it while the coating hardens.

That's it!  You've made cake pops--wasn't that easy?  Now comes the fun part: decorating.  If you want to add sprinkles or colored sugar to your cake pop, sprinkle those on while the coating is still wet, holding the pop over a bowl to catch errant sprinkles.  Otherwise, allow it to cool and harden and then go to town.  Here are some of the ideas our group came up with:

Dip first in white, then orange, then yellow for candy corn.

I used a chocolate chip for the pupil on this eyeball

Frank and two ghosts--we used black string licorice for Frank's mouth and bolts

Pumpkins--some of the girls used black candy melts to paint a jack-o-lantern face on their pumpkins

Jack Skellington--we tried using a food marker to draw his face, but it didn't work after the first one.

And, of course, my spiders.  As you can see, I never did find black sprinkles, but the spiders are pretty darn cute anyway.


Friday, October 26, 2012

Adding seam allowance to homemade pattern pieces

Hey y'all, if you're not a sewer, you might want to just tune out now.  If you are a sewer, you probably already know about this tip.  But I was pretty impressed with myself for coming up with it, so just on the off chance there's someone out there who sews and who also doesn't know this here ya go.

So I took on a sewing challenge recently, making a stuffed toy which is not available for purchase anywhere but on Etsy, for which there is also no pattern available.

So I was piecing together a pattern from various sources, even drawing some pattern pieces myself when I couldn't find any anywhere else, and I ran into a little snag, so to speak.  I would draw the pattern pieces the size I wanted them to be, but then I didn't know how to add a seam allowance.  I mean, I could have just added a line half an inch from my pattern line, but that seemed too difficult, especially on curvy or zig-zaggy pieces and a bit iffy on whether I would end up with the exact size piece I wanted when I was done.  If you have this problem, too, read on...

So.  Draw your pattern piece.  Either cut it out, or don't cut it out--doesn't matter to me.


Pin it to your fabric,


and cut out, not on the line, but give yourself a good amount of extra fabric around the piece.


Sew on the pattern line. That's right: just sew right through the pattern and fabric and everything.
 

When you're done, the pattern will just tear right off.


Trim the piece close to the sewing line and turn right side out.


And that's it! You'll end up with a sewn piece exactly the size and shape you wanted.
 

Obviously, this isn't going to work if you're needing to sew two different sized pieces together, but if you need to sew two pieces that are the same size together, like for making a crown,


or a beak, or wings, or feet, try it--you'll save yourself a lot of grief!
Related Posts Plugin for WordPress, Blogger...